Land Vehicles
From GMod Wiki
Land vehicles are contraptions like cars, robots, tanks and other player-made stuff that either uses some kind of wheel or threading mechanism, or a legged kind of way to move. The easiest thing to build is a car, as explained in the Contraption newbie tutorial page. Visit that page if you're a new builder looking for help!
Contents |
Easy bathtub car
| Land Vehicles: Easy bathtub car |
| Simple bathtub with wheels. | |
| Unspecified | |
| | Unspecified |
| | - |

Follow these easy steps to build your very own bathtub car!
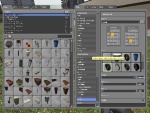
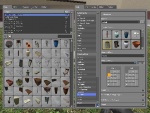
- Go to the tools menu using "Q" and spawn a bathtub [1]
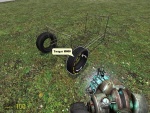
- When the tub is spawned, lift it up away from the ground with the physics gun (Blue one), while the tub is in the air freeze it using the right mouse button [2]
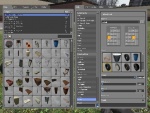
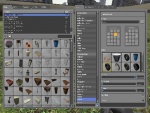
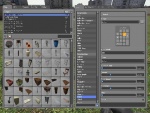
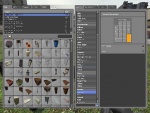
- Go to the spawn menu [Q] again and this time choose the wheel tool [3]
put the forward to 7 and backward to 4. torque should be around 4000. and the same with force limit friction 0. no collide and toggle should be on
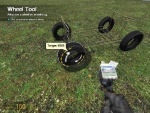
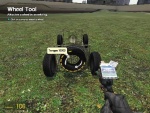
- Place two wheels (one front and one back) using the wheel tool [4]
- Once again add 2 wheels on the other side still using the wheel tool [5] Before going to Step 6 try to press 7 or 4 on the numpad. IF the tires are going in different directions step close to the tires and aim at the one you want to change direction on. then press "E" Do this with the tires that needs changed
- Now choose your physics gun (Blue one) and unfreeze the bathtub, use 7 and 4 on the numpad to make it go, go, GO!!![6]
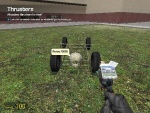
And then you are done! You have successfully created a simple bathtub car. If you'd like you can add on to it as much as you want, try experimenting with thrusters for some more speed :).
The Crippled Horse
| Land Vehicles: The Crippled Horse |
| A "crippled horse" utilizing the muscle constraints. | |
| Garry Newman | |
| | Unspecified |
| | - |
Though a little more complex to build, this contraption can be a barrel of laughs. Originally posted on [url=garry.tv]Garry's Blog[/url], the Crippled Horse uses one of GMod 10's new tools, the Muscle Constraint (self expanding and contracting hydraulics). Here's how you make it.
- Enter the tools menu by pressing and holding "Q"
- Select "Useful Construction Props" from the prop section of the Spawn menu
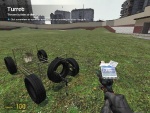
- Spawn 4 filing cabinets (2 small, 2 large), and a wooden crate. You should have the props shown in "Props Needed.jpg" spawned at this point. [7]
- Next, arrange the props in such a fashion that the 2 longer filing cabinets are parallel, and the 2 smaller ones are angled at the bottom of each longer cabinet, like so [8]. Weld the 2 longer filing cabinets together so as not to fall apart. In this capture, the head (wooden box) is not shown as it can be added later.
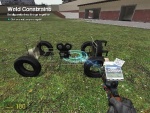
- Once this is complete, you can add the Muscle Constraints to each smaller filing cabinet, attaching them to the longer filing cabinets located above them [9]. I recommend that the "added length" should be set to 50. Note that the head has been attached to the body, along with some ropes for some pazsaz.
- After the head is attached like it is shown above using the Weld Tool, you can add a face using the Paint Tool [10]
Once everything is said and done, you should end up with this as the final product [11] Note that this is Garry's Horse, and he made it a little differently than I did. Both work on the same principle.
NOTES:
- If your horse keeps falling over, than just add a Keep Upright to the head, so it won't fall over.
- If your horse refuses to move, change the physical property of the front most cabinet to "Ice" so it will slide.
- If your Muscle Constraints start to freak out, like so [12], then start over, or try a bug fix suggested on other sections of the Wiki.
The Remote Controlled Car
| Land Vehicles: The Remote Controlled Car |
| A basic car with a third person camera and a remote control. | |
| Cjesus | |
| | Unspecified |
| | - |
This tutorial will teach you how to create a simple, drivable car with a third person view and a remote control.
The first part of this tutorial can be seen on the in-game tutorial section.
Building the Basic Car
1. Spawn the larger wooden crate in the spawn menu(Or something of a similar size).
2. Pick it up with the physgun and freeze it in mid-air.
3. Pull out your wheel gun, select a wheel you would like (hopefully of the round variety). Assign the keypad controls to something like 8 and 2 then "shoot" the car, where you would like the wheels, to create them. Make sure that you press "e" on the wheels on one side of the car so that they will all rotate in the same direction.
You now have the basic car, as seen in the in game. Now onto the features it didn't tell you.
Thrusters
1. Pull out the thruster gun, select the coca cola can and set the thrust to 2000. Now set the keypad to "Push 4, Pull 6" and place the thruster on the "front-right" side of the car.
2. Set the keypad to "Push 6, Pull 4" and place another thruster on the "front-left" side of the car.
You should now be able to steer the car with keypad 4 and 6.
Third Person Camera and the Remote control
1. Pull out your RT camera tool and set the keypad to /.
2. Stand behind the car so that you have a good view and left click.
3. Weld the camera to the body of the car. Make sure that you press / to set the current RT view to the camera that you placed. Even when you play Gmod online, only one RT camera can operate at a time.
4. To create a physical monitor that any player can look at, spawn a thin, flat object such as the wooden fence in Useful Construction Props or the plasma TV in cs_office props.
5. Magnetize it to make it unbreakable and use the material gun to set it to "RT Camera".
6. Spawn a large desk of your choice and weld it to the ground so you can place stuff on it.
7. Pull out the button tool and create a button called "forward", choose a model of your choice and set the keypad to 8. Place this on the desk.
8. Underneath the forward button, create a button set to 2 called "Reverse".
9. To the left of these two buttons, create another button called "Turn Left", set this to the 4 button and on the right, you guessed it, create a button called "Turn right" set to keypad 6.
Pressing "e" on these buttons will now have the same effect as you holding the corresponding key on the numpad.
Congratulations
You now have a basic steerable car with a third person view and a desk you can control it from. See what other modifications you can do to the car. Try adding hoverballs to the 9 and 6 keys to allow it to fly, or add a keypad 5, 10000 power thruster on the back for a turbo boost. The possibilities are endless.
Pictures Coming soon.
Massive skater
| Land Vehicles: Massive skater |
| Experimental and surprisingly stable land vehicle. | |
| plams | |
| | December 6th 2006 |
| | - |
What you need
1 crane frame 4 crane magnets

Construction
Use the motor constraint with maximum torque and on/off switch on enter. Mount all 4 crane magnets on the crane frame legs like this.

Mount thrusters with trigger on key 8 at the "backside" of your vehicle. Also mount turning thrusters for rotating, 4 in total, with keys 4 and 6. Should look something like this:

Decorate it :)

Optionally mount a pod or something so you can drive it.
Controls
When you press enter the vehicle will start "skating" and will respond nicely to your controls. 8 to move forward. 4/6 to turn. Press enter again and the vehicle will brake and come to a stop.
Try changing the crane magnet's phyical properties to super ice, REALLY allowing you to skate.
A "dog"
| Land Vehicles: A "dog" |
| A copy of the "crippled horse" in older news on the garrysmod website | |
| Macaco | |
| | December 10th, 2006 |
| | - |
Make a "dog"
Spawn a long box, then two small filing cabinets {they are right next to long box in the menu} freeze the long box sideways and in the air, then put the filing cabinets just close enough so you can barely walk in between them with hopping on the cabinets {or so when you walk on the cabinet towards the box there is barely enough room to fall off}, then whip out the muscle tool and set the speed at two, set one to anything, and put ir from the top tip facing the box to the bottom tip facing the cabinet, now set the 2nd muscles button and do the same for the other side, Keep upright the "body" if you don't want it to topple
here is a picture of what your dog should look like on the right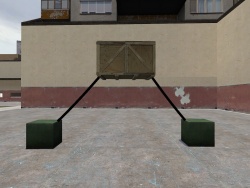
Walking the "dog"
Tap one muscles button then when that muscle is at its longest length, tap the button for the other one. Alternately, tap one muscle on and off until it is at its shortest length, then start the other one.
Juggernaught
| Land Vehicles: Juggernaught |
| A simple car with thruster based movement. It is utterly heavy with out Phy Prop alterations and normally can barrel through the jeep and many land-based cars. | |
| Vincent_Valentine | |
| | 12/06/07 |
| | - |
Needed Props: Two Iron I-Bars, Pod.
Step One: Take the Phy gun and lift one into the air, flat side faceing up.
Step Two: Use the Wheel Tool and attach four APC wheels, best to be based on the bottom corner.
Step Three: Let the bar drop. Keep it from rolling away by Phys gunning it into place. Wield the second bar facing across it. Attach APC Wheels to the end of this. This will help keep it from falling over easily.
Step Four: Attach thrusters where wanted. This will be edited further in the future.
The 4x4
| 'Land Vehicles: The 4x4' |
| A vehicle that uses various constraints in Garry's mod to create a functioning suspension allowing for greater wheel travel and making difficult map terrain easier to navigate realistically. | |
| F12Bwth (ZeosPantera) | |
| | 05/16/07 |
| | - |
Before starting I highly recommend installing the addon "PHX Premium Final" found in two part at the links below. It is a custom model pack designed for more accurate and precise building in Gmod and includes new wheels and many new construction parts. PHX Parts One and Two can be downloaded from Garrysmod.org.
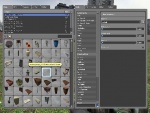
Also helpful but not required is the stacker addon found here (allows precise stacking of props with automatic welds and no-collide) - http://garrysmod.org/downloads/?a=view&id=5683 Once you have all addons you may begin by spawning a 2x4 metal plate and freezing it in place. (You can build the 4x4 with standard Gmod prop just see images at the end of entry)
Now using "Easy Weld" attach a phx #2 steel bar across the width of the plate dead center using the texture as your guide or if you have the addon Auto Snap it will assist you even more.
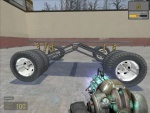
Once the center beam (marked red in pictures) is set you must place the same type of beam where you intend the axles to be when finished. Keep in mind we are building the vehicle upside down so your axle beams must be up above the steel plate and at either end, frozen with the physics gun and as parallel to each other and the center beam as possible (See picture-1 below). This task is the most difficult in the whole building process to complete unless you use the stacker tool.
The second picture shows the stacker tool stacking the center beam to the right seven times and then up (or down in this case) seven times. If using the stacker tool for this remember for this step to disable "weld props" and "no-collide". Only "freeze prop" should be active. Once stacked on both ends simply use the "remover tool" to discard beams that are not needed leaving the center and one axle beam on each side to achieve what you see in Picture-1.
 |
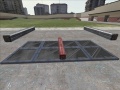 PICTURE 1: Final Positioning |
 PICTURE 2: Using the Stacker Tool |
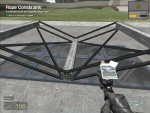
Now that you have positioned the 4 main prop in place you must connect them all together. Only one constraint that should be applied at this point, the easy weld you did to attach the center beam. The axles and plate should just be frozen in air with the physics gun's secondary fire (do not unfreeze until all constraints are made). You may now take out the "Rope Tool" and set it to rigid (style and width are up to you!) We must now make 12 (TWELVE) rigid rope connections between the two axles and the center beam. Directly below is a video showing the rest of the building process. However, to understand what is going on you must read the rest of this tutorial.
The steps below can be viewed in the following video tutorial. View In LQ.
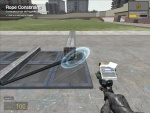
- All ropes go from the center to the axles and remain on the same side and orientation for each. The following picture shows the first rigid rope being placed from the BOTTOM RIGHT side of the center beam connecting to the BOTTOM RIGHT of the axle.
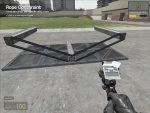
- The next connections follow suit connecting from the center to the axles in the same position. ex UPPER LEFT of center to UPPER LEFT of axle repeat until there are 4 rigid rope connections and it looks like the following picture. Repeat process on the other side.
- Now that those 8 connections have been made we must make cross connections which will hold our axles in line with the center beam. Simply use the rigid rope tool to connect the close end of the center beam with the far end of the axle as seen in the picture below. Again if you start the rope on the bottom right of the center beam it must also be on the bottom right of the axle on the opposite side (so if facing other side it is bottom left)
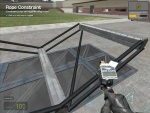
- Repeat making 3 more cross ropes until it looks like the picture below. All ropes have now been applied
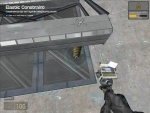
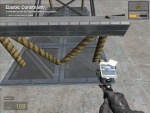
- Take out the "Elastic Tool" and set the parameters to the following (all need to be typed into textbox's manually) CONSTANT:45000.00 = DAMPING:1500.00 = RELATIVEDAMPING:15.00 again width and style are up to you (DO NOT enable stretch only). Attach the elastic from the bottom of the axle (the side facing the sky) to the plate directly below it. This may take some undoing and adjusting to make it perfectly perpendicular.
- Add 1 elastic to the end of each axle making 4 constraints total. I recommend however that one end/axle receive an extra pair of the elastic constraints for load/sway purposes connecting to a center point on the plate. See Picture below
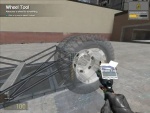
- All key suspension elements have been finished and now you may choose a wheel style and apply a wheel to the center of each axle beam. Wheel settings are as follows TORQUE:7500.00 = FORCE LIMIT:0.00 = FRICTION:4.50 Set keypad 8 for forward and keypad 5 for reverse
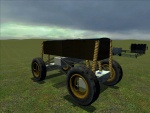
- You can now unfreeze all props with phys gun reload (the stacker props may require you touch them with the physics gun beam) and flip the vehicle over.
Thruster steering. Set up the "Thruster Tool" as follows FORCE: 3500 = No Sound. No effect. No Toggle Use just push force key settings and disable any pull key. Assume the extra elastic represents the rear of the vehicle (This is also helpful when setting the direction of the wheels with your "use" key.) Set keypad 6 to "push" and add two thrusters to the plate one front left, one rear right. Then change "push" to keypad 4 and add thrusters front right and rear left.
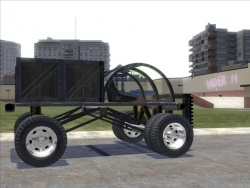
You should now have a drivable base platform to build the rest of your vehicle. Weight will become an issue with this type of suspension so be conscious of that as you add items such as seats, windows, foliage, etc. If you have a really hard time choosing lightweight props you can sparingly use the Weight Stool to adjust the mass of props. (NOTE: the 4x4 suspension needs some weight on it to function properly!)
WITHOUT PHOENIX MOD:
It is possible to build a 4x4 without installing the phx premium pack because all the same mechanics you have just learned still apply. However finding the substitute props can be time consuming. In the following pics you see a vehicle with the same suspension only it is attached to 2 vending machines and 3 CS:S control panels. The weight of the vending machines however proved too great and without the weight tool on that server the vehicle flipped constantly. Better Luck to whomever attempts it without PHX.
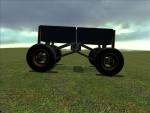
Thank you for reading my tutorial and remember to have fun out there!
Ultimate Zombie Killer
| Land Vehicles: Ultimate Zombie Killer |
| RC vehicle that can easily mow down/run over any enemy quickly and cleanly. | |
| Robert64 | |
| | 18/09/07 |
| | - |
A simple but powerful vehicle. Easy to control and stable. Also good for races and vehicle war games.
Construction
1. Spawn a bedframe and freeze it with the Physics Gun.
2. Attach a pair of wheels (small tyres) on either side at the front with torque on full, and forward as 8 and back as 2. Make sure all wheels turn in the right direction (both will pull the car forward).
3. At the rear left (looking down) add a wheel with the same torque and model, but the keys as forward is 6, and reverse is 4. Repeat on the other side but with the keys set the other way round (4, 6). Make sure all wheels will propell the car forward.
4. Add a thruster to the centre rear of the bedframe, with full force and push key as 7 (no pull key).
5. Add a wheel on the front of the bedstand so it is not touching the floor and same model / settings except the forward key is 9 (no reverse key).
6. Add four turrets at 90 degree intervals on this wheel so they are facing forward, with optional force and dammage but interval of 0.10 and key set to the same as the wheel (9).
7. Weld a camera on the middle flat bit of the bedstand facing forward and optional use key as long as it isn't 7,8,9,4,6 or 2.
8. Unfreeze everything.
Driving
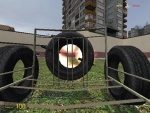
- Use the hole in the tyre as a guide to where your "chaingun" will shoot.
- The vehicle is easy to control;
- 8 to excellerate
- 2 to reverse
- 4 turns left
- 6 turns right
- 7 is nitros boost (for running enemies over)
- 9 is chaingun (turrets on a wheel)
- Have fun!
Very Simple Car for Beginners
| Land Vehicles: Very Simple Car for Beginners |
| The simplest land vehicle, a very basic car. | |
| Zatar963 | |
| | 3 January 2008 |
| | - |
What you will need
- A blast door
- The wheel gun
- 3 Thrusters
- Phx Model Pack Airboat Seat or a Pod
Construction
First of all, freeze your Blast Door in the air with the PhysGun. Then, get out your Wheel Gun and attach wheels on all 4 corners of the Blast door. Make sure the torque is 0.00. Add 2 thrusters on the back at about 3000 power, and make the controls 8 for up, and 5 for down. Now, put one thruster on the side and make the controls 4 for left and 6 for right. Now, spawn an Airboat Steat or a Pod. Get out your Easy Weld tool gun and Easy Weld it to the top-front of the Blast Door. Get into it and start to drive!
Other optional things that you can do:
- Add turrets on the front
- Add lamps as headlights
- Anything you want to do to customize it!
Batcar
| Land Vehicles: Batcar |
| A medium-sized car with suspension and "wings" | |
| CroutonSamurai | |
| | 10 October 2009 |
| | - |
Things you will need
- Phx Model Pack 2x4 plate
- Two Phx Model Pack beams (The shortest ones you can find)
- Five Phx Model Pack beams (Should be as long as the short side of the 2x4)
- Three Phx Model Pack beams (Should be as long as the long side of the 2x4)
- Seat of your choice
Tools you will use
- Easy Weld
- Weld
- Axis
- Rope
- Elastic
- Thrusters
- Wheels
- Stacker
- Smart Snap
Construction
If you can make a suspension system that fits a 2x4 Phx Model Pack platform, great. If not, go to http://www.youtube.com/watch?v=arcrqAoQoa8&feature=player_profilepage# NOTE: Do not replicate his system exactly-it uses a different steering system. Instead, just make a simple I-shape on bottom with either all the beams on the same level, or both short beams completely under the long beam.
First, Easy Weld the 2x4 across the three top beams--it should cover them all. Easy weld the really short beams to the top of the platform longitudinally, near where you want the back of your car to be. Then, Axis weld the other two really long beams parallel to the short ones, but outside of them and in the front. Use your elastic-making powers to bind the long bars to the short ones next to them, I recommend two elastics per bar. If you haven't already, freeze your rig. Then, drag the long bars out to 90 degree angles with the platform's long sides and freeze them. Using your rope tool (be sure to switch it back to non-rigid), constrain thine beams so that thou shalt not experience a severe dislocation of wings. Throw on a couple of thrusters at the ends of each wing. Set the different wings to different buttons, though, so you can steer. You might want to add a seat and some wheels, and then you're done!
Driving
It's easy, smooth, and pretty fast. You don't even need to use the wheel tool; you could really just axis weld a few props on there. I've found that no matter what, driving this thing with wheels is crappy, unless you lower the weight of everything, in which case it spazzes out when you use the thrusters.
Possible Addons
Mod it as much as you can, add thrusters if you want (to make it into a full-blown plane, or just a really good jumper), maybe turrets, maybe weightless props for aesthetic appeal and nothing more, or whatever you want.
Credits
INSPIRATION: Kerbii's rocket car http://www.youtube.com/watch?v=KRyrRH5y3d8 SUSPENSION: GunskiMod (URL above)
Basic Tank
| Land Vehicles: Basic Tank |
| Simple Tank with a rotatable cannon. YOU NEED THE CANNON TOOL. | |
| Eggmaster2000 | |
| | April 17 2010 |
| | - |
Construction
- Create a cuboid-like prop.
- Make lots of them and weld them all into a single large cuboid.
- Adjust size to fit atleast 4 wheels on each side.
- Add 4 wheels on each side, set them to "8" and "5".
- Create a barrel and weld it to the top of the back of the cuboid.
- Attach a wheel onto the top of that barrel, set it to "7" and "9".
- Weld a barrel onto the front of the wheel.
- Use the cannon tool and create a cannon on the front of the barrel. Set it to "0".
- Add a thruster at the front of the LEFT side of the cuboid, power of 1000 and set push to "6"
- Repeat with the RIGHT side, power of 1000 and set push to "4".
THE RESULT
Your tank can move and turn through thrusters. With a rotatable turret that fires a cannon.
This is only a SIMPLE tank, and you may want to tweak it a little.

![[1]](http://imageshack.us/photo/my-images/483/step1kc6.jpg/)
![[2]](http://imageshack.us/photo/my-images/58/step2ua4.jpg/)
![[3]](http://imageshack.us/photo/my-images/233/step3nz8.jpg/)
![[4]](http://imageshack.us/photo/my-images/217/step4oc5.jpg/)
![[5]](http://imageshack.us/photo/my-images/488/step5jj2.jpg/)
![[6]](http://imageshack.us/photo/my-images/487/step6zq0.jpg/)
![[7]](../www.mcafeenet.net/hoga/Props%20Needed.jpg)
![[8]](../www.mcafeenet.net/hoga/Basic%20Layout.jpg)
![[9]](../www.mcafeenet.net/hoga/The%20Body.jpg)
![[10]](../www.mcafeenet.net/hoga/Emot-Frowns.jpg)
![[11]](../www.mcafeenet.net/hoga/Cripple-Horse2.gif)
![[12]](../www.mcafeenet.net/hoga/Uh-Oh.jpg)