Wired Chaser Cube
From GMod Wiki
Chaser Cube aka Pet Cube
| Wired Chaser Cube: Chaser Cube aka Pet Cube |
| Wired Chaser Cube Tutorial | |
| nxc[1] | |
| | May 2007 |
| | - |
So How Do I Make it?
- Don't Panic! It sounds complicated, but it really isn't at all!
What You Need To Do!
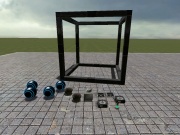
Step 1. Spawn a 2x2x2 cube. (From PHX pack) Lift it up slightly using phys gun so it's off the ground.
Step 2. Select the Target Finder located under Wire - Beacon. The settings should be as follows:
- Minimum Range = 1
- Maximum Range = 5000
- Max. Number of Targets To Track = 1
- Max. Number of bogeys = 5
Check Only Boxes Listed:
- 1. Target Players
- 2. Target NPCs
- 3. Paint Target
- Total Checked: 3
Now, that you have the correct settings, just place it somewhere on the Cube (preferably inside)
Step 3. Select the Gate - Arithmetic with Multiply selected. (Keep Noclip unchecked) Place 2 (two) of them next to each other, but not too close so you can wire it neatly.
Step 4. Select Numpad Input in the Wire - I/O section. This will control the ON/OFF for our pet. So select which key will by ON/OFF. Make sure Toggle is checked and the values set like so: value on = 1 and value off = 2 Place this input on your cube.
Step 5. Take the Numpad Input again and change the input to another key. This input will be for holding a target once it's locked on by your pet (If you want it to follow you, and only you.) Place this near the previous Numpad Input.
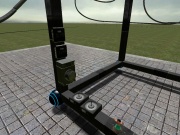
Step 6. Select Hover-Ball located under Construction Select which keys will toggle Up/Down. I choose (+) and (-) because it's easiest to remember. Place 1 (one) in every corner of the cube (Making that a total of 8 (eight)).
Now it gets a bit tricky, so read carefully.
Step 7. Find Beacon Sensor and make sure the following are checked (not included means keep them unchecked):
- Split X,Y,Z
- Output Distance
Now, this is a crucial step, the direction in which the "hula girl" is facing it the 'front'. So place her facing OUTWARDS from the cube on the top. Very good ^_^ We are almost done :sigh:
Step 8. Scroll down to the bottom where you will find Thrusters located under the Wire - Physics category. Set the settings as follows:
- Force Multiplier = 80
- Force Minimum = 0
- Force Maximum = 10,000
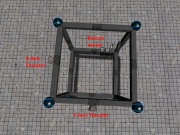
Place 1 (one) thruster behind "hula girl" aka Beacon Sensor so it should be on the opposite side of the cube behind her as if there was a straight line going across.
Now Place your second thruster on the LEFT side of the cube, in comparison to the "hula girl"
If you were looking at the cube from the top it would look like this: Hula girl on top facing outwards, read thruster on the bottom, and side thruster on the LEEFT (MUST BE ON THE LEFT)
== Wiring It All Together ==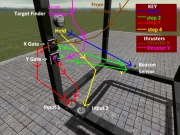
- I will try to make this as clear as possible, where as this part is pretty complicated for some people.
ALL the way at the bottom find Wire and select it.
LC = left click
RC = Right Click
LC Sensor Beacon -> LC Target Finder For this part you must remember which Multi Gate is which, I would use the namer to name one "X" and the other "Y"
LC Multi Gate (X) -> Sensor Beacon(X) (As soon as you LC sensor beacon, a letter will appear, RC the beacon untill it displays X then LC, meaning you wired Multi Gate X to the sensor's X axis)
LC Multi Gate (Y) -> Sensor Beacon (Y) (Same applies as previous, RC until you get Y and LC again)
You also want to keep track of both your inputs, name one of them Input 1 and the other Input 2
RC Multi Gate (X) (so the letter B pops up over it) LC (once it displays B) -> Input 1
LC Multi Gate (Y) (IF it already shows B, if not, RC first) -> Input 1
Wiring the Thrusters
You are also going to have to name the thrusters, make sure the rear thruster is named Y because it will be moving along the Y axis. And the thruster on the left side, name it X because it will be moving along the X axis
LC Thruster (Y) (the rear one) -> LC Multi Gate (Y)
LC Thruster (X) (the left one) -> LC Multi Gate (X)
RC Target Locater (so it displays 'Hold Target') now LC it. -> LC Input 2
FINALLY WE ARE DONE :fewf:
You may now UNFREEZE your pet!
Remember, to turn on/off use the key you linked Input 1 to and to Hold Target use the key you linked Input 2 to. You can also control your pet's high using your hoverballs! :D
ENJOY
Optional
What you can do to hide all the wiring by going to Colour and setting Alpha (the bar all the way at the right) to 0 and clicking all your wired objects. To make things even cooler once you've hidden your wiring, you can choose the Material tool and make your cube any material you want!
