Creating a HUD
From GMod Wiki
| Lua: Creating a HUD |
| Shows people how to make a HUD | |
| Brian Nevec | |
| | 29th June, 2009 |
Contents |
Preface
This tutorial is about making heads-up-displays, or HUDs in short. I've seen a lot of you young scripters and even some of the old ones making huds, but only a few of you make them right.
This tutorial is going to show you how to make a small and well laid out health and armor display. Now, we are going to approach this by not slapping everything into one HUDPaint event. We are going to do it in a modular way - by making a few functions for drawing similar panels and then use those functions to draw the hud itself.
Getting started
To make the code tidy, we'll be putting every variable and function in a table, so lets start off with making the table.
good_hud = { };
I'm going to assume that you know about gmod's file structure and where everything goes.
The bar
Next, we'll make a function for drawing a bar.
function good_hud:PaintBar( x, y, w, h, colors, value )
end
X, Y, W and H are fairly obvious, but if you don't know what they are - X is the horizontal coordinate on the screen, Y is the vertical coordinate on the screen, W is the width, H is the height. Next we have colors. Colors for us will be a table with four elements - border, background, fill, shade. I will explain these later. And the last argument - value - is going to indicate how far the bar is gone from 0 width to W width. Lets go and fill the function up!
function good_hud:PaintBar( x, y, w, h, colors, value )

	surface.SetDrawColor( clr( colors.border ) );		-- set border draw color
	surface.DrawOutlinedRect( x, y, w, h );			-- draw the border

	x = x + 1;						-- fix our position and size
	y = y + 1;						-- the border is about 1 px
	w = w - 2;						-- thick
	h = h - 2;

	surface.SetDrawColor( clr( colors.background ) );	-- set background color
	surface.DrawRect( x, y, w, h );				-- draw background

	local width = w * math.Clamp( value, 0, 1 );		-- calc bar width
	local shade = 4;					-- set the shade size constant

	surface.SetDrawColor( clr( colors.shade ) );		-- set shade draw color( actually, instead of shade it should be fill )
	surface.DrawRect( x, y, width, shade );			-- draw shade

	surface.SetDrawColor( clr( colors.fill ) );		-- set fill color( it should be shade instead of fill )
	surface.DrawRect( x, y + shade, width, h - shade );	-- draw fill

end
What we're doing here is basically just putting some function calls into one function and doing some small math. But wait, did you notice? There's a small function called "clr" that you have never heard of before. That's right.
local function clr( color ) return color.r, color.g, color.b, color.a; end
This function just takes a color object and splits it up into multiple returns. This is specifically for the "surface" functions, since none of them accept a color object.
To the hud, I used the following setup.
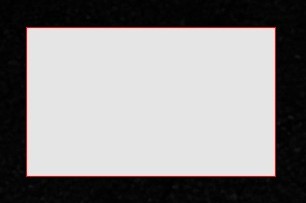
local colors =
{

	border = Color( 255, 255, 255, 255 ),
	background = Color( 255, 255, 255, 200 ),
	shade = Color( 225, 225, 225, 255 ),
	fill = Color( 0, 0, 0, 255 )

};

good_hud:PaintBar( 50, 50, 250, 16, colors, 0.75 );
And the outcome looks like this.
![]()
This is just an example of what the function does, we won't be using that color setup in the end.
The box
We don't want to leave our bars just hanging there, they need a background! Don't fear, here is how we draw the background.
function good_hud:PaintPanel( x, y, w, h, colors )

	surface.SetDrawColor( clr( colors.border ) );		-- set border color
	surface.DrawOutlinedRect( x, y, w, h );			-- draw border

	x = x + 1;						-- fix positions and sizes
	y = y + 1;
	w = w - 2;
	h = h - 2;

	surface.SetDrawColor( clr( colors.background ) );	-- set background color
	surface.DrawRect( x, y, w, h );				-- and paint background

end
It is as simple as that. X, Y, W and H I already explained. Colors is almost the same, except that it only needs two fields - border and background.
Using the following code.
local colors =
{

	border = Color( 255, 255, 255, 255 ),
	background = Color( 255, 255, 255, 200 ),

};

good_hud:PaintPanel( 50, 50, 250, 150, colors );
It looks like this.
But wait.. it looks similar to the one we already made..? Yes, it does. I thought you said something about optimised and well laid out stuff.. Yeah, I did, I thought you would figure that out yourself, but I guess I'll have to do it myself.
function good_hud:PaintBar( x, y, w, h, colors, value )

	self:PaintPanel( x, y, w, h, colors );			-- paint border and background

	x = x + 1; y = y + 1;					-- fix positions and sizes
	w = w - 2; h = h - 2;

	local width = w * math.Clamp( value, 0, 1 );		-- calc bar width
	local shade = 4;					-- set shade constant

	surface.SetDrawColor( clr( colors.shade ) );		-- set shade color
	surface.DrawRect( x, y, width, shade );			-- draw shade

	surface.SetDrawColor( clr( colors.fill ) );		-- set fill color
	surface.DrawRect( x, y + shade, width, h - shade );	-- draw fill

end
Now our PaintBar function uses our new PaintPanel function to draw some common parts. Works exactly the same, except it now has less code. And if we wanted to change how the background looks( maybe add an image or something ), we wouldn't have to change it in two different places.
The message
We have the bars and stuff done, now it's time for text. We already have some functions in the draw library that handle text, but for the sake of the tutorial we'll make our own.
function good_hud:PaintText( x, y, text, font, colors )

	surface.SetFont( font );			-- set text font

	surface.SetTextPos( x + 1, y + 1 );		-- set shadow position
	surface.SetTextColor( clr( colors.shadow ) );	-- set shadow color
	surface.DrawText( text );			-- draw shadow text

	surface.SetTextPos( x, y );			-- set text position
	surface.SetTextColor( clr( colors.text ) );	-- set text color
	surface.DrawText( text );			-- draw text

end
The PaintText function draws a piece of text with a small shadow. X and Y I already explained, text is the text we want to draw, font is the font and colors is again a table of colors, except with different fields - shadow - color of the text shadow, text - color of the text itself.
Using the following code.
local colors =
{

	shadow = Color( 0, 0, 0, 155 ),
	text = Color( 255, 255, 255, 255 )

};

good_hud:PaintText( 50, 50, "Hello world!", "default", colors );
The output looks like this.

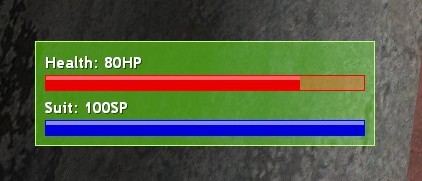
Putting it all together
So, we went through how each component works, added a convenience function and made one component interact with the other. Now it's time to put everything together, so it looks like this.
Here is the code you should have fiddled together by now.
good_hud = { };

local function clr( color ) return color.r, color.g, color.b, color.a; end

function good_hud:PaintBar( x, y, w, h, colors, value )

	self:PaintPanel( x, y, w, h, colors );

	x = x + 1; y = y + 1;
	w = w - 2; h = h - 2;

	local width = w * math.Clamp( value, 0, 1 );
	local shade = 4;

	surface.SetDrawColor( clr( colors.shade ) );
	surface.DrawRect( x, y, width, shade );

	surface.SetDrawColor( clr( colors.fill ) );
	surface.DrawRect( x, y + shade, width, h - shade );

end

function good_hud:PaintPanel( x, y, w, h, colors )

	surface.SetDrawColor( clr( colors.border ) );
	surface.DrawOutlinedRect( x, y, w, h );

	x = x + 1; y = y + 1;
	w = w - 2; h = h - 2;

	surface.SetDrawColor( clr( colors.background ) );
	surface.DrawRect( x, y, w, h );

end

function good_hud:PaintText( x, y, text, font, colors )

	surface.SetFont( font );

	surface.SetTextPos( x + 1, y + 1 );
	surface.SetTextColor( clr( colors.shadow ) );
	surface.DrawText( text );

	surface.SetTextPos( x, y );
	surface.SetTextColor( clr( colors.text ) );
	surface.DrawText( text );

end
After tinkering with the hud, I decided to add this function as well.
function good_hud:TextSize( text, font )

	surface.SetFont( font );
	return surface.GetTextSize( text );

end
It basically just gets width and height of the given text using the given font.
The hud
This is where we start making our hud.
local vars =
{ };

local colors =
{ };

local function HUDPaint( )

end
hook.Add( "HUDPaint", "PaintOurHud", HUDPaint );
Now, the vars table is where we will keep our sizes and offsets, and colors is where we'll keep our colors. We are going to make this dependant on the screen resolution, so there won't be any direct sizes stored.
This is how it looks like.
local vars =
{

	font = "TargetID",

	padding = 10,
	margin = 35,

	text_spacing = 2,
	bar_spacing = 5,

	bar_height = 16,

	width = 0.25

};
Font is the font we'll be using for our text, padding will be the inner space between bars and text and the border, marging is the space between the hud element and the screen sides, text_spacing is the space between text and its bar, bar_spacing is the space between a bar and the next text line, bar_height is the height of a bar and width is the width of the element relative to the screen width.
local colors =
{

	background =
	{

		border = Color( 190, 255, 128, 255 ),
		background = Color( 120, 240, 0, 75 )

	},

	text =
	{

		shadow = Color( 0, 0, 0, 200 ),
		text = Color( 255, 255, 255, 255 )

	},

	health_bar =
	{

		border = Color( 255, 0, 0, 255 ),
		background = Color( 255, 0, 0, 75 ),
		shade = Color( 255, 104, 104, 255 ),
		fill = Color( 232, 0, 0, 255 )

	},

	suit_bar =
	{

		border = Color( 0, 0, 255, 255 ),
		background = Color( 0, 0, 255, 75 ),
		shade = Color( 136, 136, 255, 255 ),
		fill = Color( 0, 0, 219, 255 )

	}

};
Here are the colors. The bar colors aren't really as good as I wanted them to be, but this is just an example, so the colors are up to you.
And finally here is our HUDPaint event.
local function HUDPaint( )

	client = client or LocalPlayer( );				-- set a shortcut to the client
	if( !client:Alive( ) ) then return; end				-- don't draw if the client is dead

	local _, th = good_hud:TextSize( "TEXT", vars.font );		-- get text size( height in this case )

	local i = 2;							-- shortcut to how many items( bars + text ) we have

	local width = vars.width * ScrW( );				-- calculate width
	local bar_width = width - ( vars.padding * i );			-- calculate bar width and element height
	local height = ( vars.padding * i ) + ( th * i ) + ( vars.text_spacing * i ) + ( vars.bar_height * i ) + vars.bar_spacing;

	local x = vars.margin;						-- get x position of element
	local y = ScrH( ) - vars.margin - height;			-- get y position of element

	local cx = x + vars.padding;					-- get x and y of contents
	local cy = y + vars.padding;

	good_hud:PaintPanel( x, y, width, height, colors.background );	-- paint the background panel

	local by = th + vars.text_spacing;				-- calc text position

	local text = string.format( "Health: %iHP", client:Health( ) );	-- get health text
	good_hud:PaintText( cx, cy, text, vars.font, colors.text );	-- paint health text and health bar
	good_hud:PaintBar( cx, cy + by, bar_width, vars.bar_height, colors.health_bar, client:Health( ) / 100 );

	by = by + vars.bar_height + vars.bar_spacing;			-- increment text position

	local text = string.format( "Suit: %iSP", client:Armor( ) );	-- get suit text
	good_hud:PaintText( cx, cy + by, text, vars.font, colors.text );	-- paint suit text and suit bar
	good_hud:PaintBar( cx, cy + by + th + vars.text_spacing, bar_width, vars.bar_height, colors.suit_bar, client:Armor( ) / 100 );

end
hook.Add( "HUDPaint", "PaintOurHud", HUDPaint );
I hope this tutorial helped you understand how to make a proper hud. There are some parts that could have been done better, but I'll leave that up to you.
Good day!
PS: I just realized that some of my comments aren't explaining stuff correctly, but the coding is pretty straight-forward and doesn't need much explanation.
