Holo Helix
From GMod Wiki
| This page has been nominated for deletion. Deletion is due within approximately 30 days from nomination, unless the deletion has been disputed on the talk page. See more pages nominated for deletion here. Reason for deletion: Not what Garry wants the wiki to be used for Last Edit was made on 11/16/2011 |
Contents |
Holo Double Helix
| Holo Helix: Holo Double Helix |
| Creates a DNA-ish hologram around the player of your choice. | |
| Entoros | |
| | February 1, 2009 |
| | Nothing, really. |
Getting the Parts
To start out, let's get everything together first. Just a note; because I really don't want to take the time to lay everything out in gates, it's all packed into Expression 2. Sorry; I'll get to it eventually, and it'll be explained at the end.

- Spawn something to place all of this on, like a 1x1 PHX plate.
- Spawn a Holo Grid on the plate.
- Spawn two Holo emitters with different colors, uncheck show beam, point size around 3, and client FadeRate of 50.
- Spawn a Wired Numpad with Value On of 1, Value Off of 0, and check Toggle.
- Spawn an Expression 2 chip with the following code:
@name Holo Helix
@inputs
@outputs X Y Z X2 Y2 Z2 FadeRate
@persist Player:entity Time
Player = findPlayerByName("YOUR NAME HERE")
X = sin(Time*180)*20 + Player:pos():x()
Y = cos(Time*180)*20 + Player:pos():y()
Z = cosr(Time)*35 + 35 + Player:pos():z()
X2 = sin(Time*180 + 180)*20 + Player:pos():x()
Y2 = cos(Time*180 + 180)*20 + Player:pos():y()
Z2 = Z
FadeRate = 50
interval(20)
Time += 0.02
- Note: there's no more need for a target finder; just put your name where it says "YOUR NAME HERE". Also note that if you have a clan tag within brackets or dashes, the clan tag should be omitted. For Example: "[GM] Someperson -GM2-" would input his name as "Someperson".
Wiring the Components
Most of the wiring is pretty self explanatory, but I'll walk you through just to make sure everything is wired up right.
- Take out the Holo Emitter tool. Right click the first holoemitter, then left click the holo grid. Do the same with the other holo emitter.
- Take out the Wire tool. For the first holo emitter, wire the X to the X of the Exp2, Y to the Y, Z to the Z, and FadeRate to the FadeRate.
- Wire the Active to the "0" of the Wire Numpad.
- Repeat steps 2 and 3 for the other holo emitter, except wire the X of the Holoemitter to the X2 of the Exp2, Y to Y2, and Z to Z2.
- Wire the "UseGPS" of the Hologrid to any of the outputs on the Exp. 2 chip.
The Finished Product
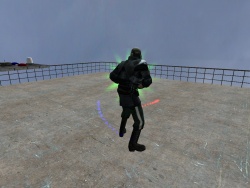
Whew! Now that everything's wired up and ready to go, press "0" on your Numpad, and you should find yourself in a twisting series of holograms. Use a Camera to check yourself out.
The Explanation
The Expression uses a bit of math to figure out how to put this thing in a double helix; essentially, by doing X = sin(Time) and Y = cos(Time), it makes a circle. By doing Z = cosr(Time), it makes this circle move up and down. In the X2/Y2, by adding 180 to the sin/cos, it puts the other beam opposite the original.
