Wire Blast Door
From GMod Wiki
Contents |
Wired Blast Door
| Wire Blast Door: Wired Blast Door |
| How to make a keypad activated Blast Door for your base or fort. | |
| the_Demongod | |
| | 10 July 2011 |
| | - |
How to Make the Doors

1. Find a space to use as a doorway. It could be a gap in the wall of your fort, or part of the map. A large doorway is best (for a good test you should easily be able to drive a small jeep through it without hitting the sides). If you can't find one, I recommend the large doorway in the end of the smaller building in the generic "gm_construct" map, which is where I designed this contraption the the first place.
2. Spawn a blast door from "Useful Construction Props." I like to use the biggest one (I think it is the 3rd one in the list).
3. Position the blast door so that it is in the middle of the doorway (or wherever you want your door to be) and freeze it.
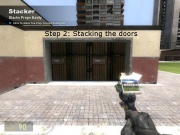
4. Use the Stacker tool (if you don't have it, you can download it here) and stack the blast door to the left and right until the entire span of the doorway is covered. Make sure "Freeze" and "Weld" are checked. After you have done that, stack all the plates upward until they hit the top of the door frame. The entire doorway should be completely blocked. Now go inside the building and stack the blast doors towards you. If done properly, there should be nothing touching the top of the inner layer of doors.
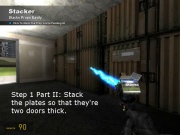
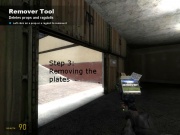
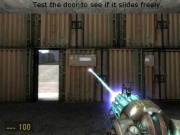
5. You should now have a 2-layer thick wall of blast doors completely obstructing the doorway (don't want any "stray" grenades slipping in). Find a plate that you would like to be the door. Shoot it with your remover tool and the one under that as well, so that there is a hole through the plates to the inside. Then go inside, and delete the inner plate to the right or left of where the door will go. This will leave a place for the door to slide out of the way when open.
6. Place a blast door in the hole in the wall beneath the inner plate above the hole. This is a bit tricky, but keep trying until it looks as if it was one of the previous stacked ones. Find a way to get it in there somehow. Try using perpendicular surfaces and slider constraints, or even try using the stacker tool with all the constraints (weld, freeze, etc) disabled. Anything works as long as you get the plate in position. Remember, if you hold shift+E while holding something with physgun it will align it to an invisible grid to make positioning objects easier.
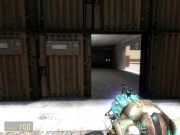
7. Get the Slider constraint tool and right click on two places on the side of the place facing the place where you deleted a plate on the inside for a place to slide. Unfreeze the plate if it is frozen (which I recommend), and the plate should slide easily so that it covers and uncovers the entryway. It is also a good idea to no-collide the sliding door with the other plates in the wall you made. This makes the door slide in and out more smoothly.
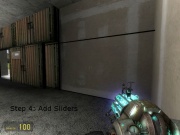
Wire
1. Find a spot where you would like to do your wiring (preferably inside your base to prevent tampering) and get the Gate-Memory tool. Choose "Toggle" (the one without "while" on the end) from the list and place it wherever you want.
2. Get the Wire-Hydraulic tool and right-click between the sliders on the door. Then click on the wall where you are doing your wiring. This will place the controller for the hydraulic line.

3. Go to Gate-Time and choose a Smoother. Place it next to the Toggle.
4. Get the Constant Value tool. Give it 3 values. Then get out your PhysGun and drag your door to the position you would like it when it's open. Mouse over the Hydraulic controller and take note of the length of the line. Then drag the door all the way closed, and once again note the length of the line. Write these numbers down somewhere. Then assign these numbers to constant values like this:
Value 1: value=[length of hydraulic line when door is open]
value type=number

Value 2: value=[length of hydraulic line when door is closed]
value type=number

Value 3: value=[speed you want door to open/close]
I recommend 25. It is a good not too fast not too slow speed. However you may experiment and
change it so that it's how you like it. 5 is good for a slow sort of tense
hold-em-off-till-the-doors-shut kind of effect.
1 and 2 are actually interchangeable, because they are just going to be toggled between the two.
place the constant value near the smoother.
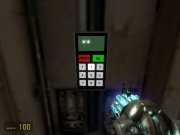
5. Place a button or keypad on the outside so that you will be able to open the door from the outside, then place a button or keypad on the inside so you can open from the inside (probably a keypad, i don't know why you would require a password to get out... maybe good if have the intent of keeping prisoners). Keypad download is available for download here
6. Go to Gate-Logic and get and OR(any) gate. This will let you open the door from either side. place it next to the toggle.
Wiring
1. Wire any of the inputs of the Logic gate to the "Valid" output of the Keypad. Wire another logic input to the "Out" output of your button or second keypad.
2. Wire the "Clk" (clock) input of the Toggle to the "Out" output of the logic gate
3. Wire the OnValue input of the Toggle to either the "A" or "B" output on the Constant Value.
4. Wire the OffValue input of the Toggle to the "A" or "B" output of the Constant value (whichever one you didn't use for the OnValue).
5. Wire the "A" input of the Smoother to the "Out" output of the Toggle.
6. Wire the "Rate" input of the Smoother to the "C" output of the Constant value (this is the rate at which your door moves).
7. Wire the "Length" input of the Hydraulic Controller to the "Out" output of the Smoother.
Finishing and Troubleshooting
Your door will either snap to the open or closed position. Whichever it does, it doesn't matter because it just toggles open or closed. Test the Keypad and button to make sure everything works. If the door does not open all the way, or it does not close all the way, your might have to tweak the A and B values on the constant value to make it do so. If the gate closes too fast or too slow, you may have to change the C value to suit your needs. If more than one of these problems is occurring, it may be that you just wired the wrong values of the constant value to the wrong input, so check your wiring. One not so obvious problem is that if you you place the keypad directly on the door, the keypad must not have the "Freeze" constraint checked, or it will not allow the door to move. The keypad MUST HAVE "FROZEN" UNCHECKED! this problem is not easy to troubleshoot because one would look for wiring problems and not this. When you finish your wiring, grab the door with your Physgun, and see if it can still move. If it can't, go to the keypad tool and see what constraints you were using when you made the door. Chances are this is your problem.
Further Learning
If you are used to Wiremod and you are good at it already, you can skip this section. If you are new to Wiremod, and you want to have a better understanding of it, you should read this section.
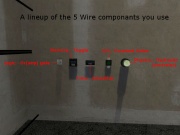
Here is what each of the components do:
Button/Keypad: when activated, sends out a value
or(any) Logic Gate: sends out a value if any of it's inputs are given a value
Toggle: toggles between outputting an offvalue or an onvalue when given a value
Smoother: takes in a value called A and outputs it's average over a rate it is given
Hydraulic: pushes or pulls an object a certain amount when given a value in
When the button is pressed, a value is sent through the Logic Gate into the Clock input of the toggle. This causes it to output it's other value. The off and on values are the lengths of the hydraulic line in it's open/closed states. The new value is sent into the Smoother as "A", and it it's average is calculated at the rate which comes in from the constant value. The smoother gives this value to the length input for the Hydraulic controller, which smoothly pushes the door open or pulls it closed. If you don't understand the whole Smoother thing it basically means that the smoother will smoothly transition from the previous value from the toggle into the new value at the rate you told it to, which makes the door smoothly open or close, instead of immediately snapping open or closed.
Video
Here is the tutorial where I learned how to do the wiring. fireball79058350's Video Tutorial
Credit for all wiring goes to fireball79058350. I did not make up this wiring myself. I claim credit for the way the door is made and positioned, and for the Logic gate to have two buttons to open and close the gate. If anyone has already made this and claims credit for it, I have not seen it.
