Mesh Library
From GMod Wiki
| | Go to: Useful Information |
| Lua: The mesh library |
| Explains how to use the mesh library | |
| Brian Nevec | |
| | 10th April, 2010 |
Contents |
Overview
Everything in Source is made up of meshes, which are made up of triangles and then - vertices. The mesh library allows you to create your own meshes dynamically by defining vertices and polygons. This article will explain how to work with this library, what each function does, etc.
The mesh library should be used in draw hooks, preferably ENT:Draw.
Basics
The mesh library works like this:
- start a mesh with mesh.Begin,
- add vertices using other mesh.* functions,
- end and draw the mesh using mesh.End.
Before you do so, however, you need to set a material using render.SetMaterial. The mesh you create works exactly like models on props and NPCs. Any rendering functions that affect models will most likely affect your mesh as well. Through this article I use the "models/debug/debugwhite" material.
Lets draw a simple triangle:
mesh.Begin( MATERIAL_TRIANGLES, 1 );

mesh.Position( Vector( 0, 0, 0 ) );
mesh.AdvanceVertex( );
mesh.Position( Vector( 50, 0, 0 ) );
mesh.AdvanceVertex( );
mesh.Position( Vector( 0, 50, 0 ) );
mesh.AdvanceVertex( );

mesh.End( );
The above code will draw a triangle in the middle of the map facing downwards. The direction is defined by the order in which you define your vertices. If you define them in a clockwise order (like in the example), the polygon will face one direction, but if you define them in a counter-clockwise order, they will face the opposite direction.
Primitive types and count
The function mesh.Begin requires two values: primitive type and count. The primitive type can be one of the following values:
- MATERIAL_POINTS - Doesn't seem to do anything, may require a special material. Each vertex is a single primitive.
- MATERIAL_LINES - Draws lines. Two vertices define a single primitive.
- MATERIAL_TRIANGLES - Draws triangles. Three vertices define a single primitive.
- MATERIAL_TRIANGLE_STRIP - Same as LINE_STRIP, but with triangles.
- MATERIAL_LINE_STRIP - Draws a collection of connected lines. The end point of the current line is the starting point of the next line. Each vertex is a single primitive.
- MATERIAL_LINE_LOOP - Not sure.
- MATERIAL_POLYGON - Draw a single polygon. Each vertex is a single primitive.
- MATERIAL_QUADS - Draws quads. Four vertices define a single primitive.
You can get more information on some of these types here. Though, I can't guarantee that the information can be used in Source.
Lets draw a quad:
mesh.Begin( MATERIAL_TRIANGLES, 2 );

mesh.Position( Vector( 0, 0, 0 ) );
mesh.AdvanceVertex( );
mesh.Position( Vector( 0, 50, 0 ) );
mesh.AdvanceVertex( );
mesh.Position( Vector( 50, 0, 0 ) );
mesh.AdvanceVertex( );

mesh.Position( Vector( 50, 50, 0 ) );
mesh.AdvanceVertex( );
mesh.Position( Vector( 50, 0, 0 ) );
mesh.AdvanceVertex( );
mesh.Position( Vector( 0, 50, 0 ) );
mesh.AdvanceVertex( );

mesh.End( );
In order to draw a quad using the TRIANGLES type, you need to define six vertices - three for each triangle. A quad is made up of two triangles, so you need to supply two as the primitive count.
Lets draw a quad using the QUADS type:
mesh.Begin( MATERIAL_QUADS, 1 );

mesh.Position( Vector( 0, 0, 0 ) );
mesh.AdvanceVertex( );
mesh.Position( Vector( 0, 50, 0 ) );
mesh.AdvanceVertex( );
mesh.Position( Vector( 50, 50, 0 ) );
mesh.AdvanceVertex( );
mesh.Position( Vector( 50, 0, 0 ) );
mesh.AdvanceVertex( );

mesh.End( );
Now, you only need to supply four vertices, one for each corner. A very useful function for drawing quads is mesh.QuadEasy.
mesh.Begin( MATERIAL_QUADS, 1 );

mesh.QuadEasy( vector_origin, vector_up, 50, 50 );

mesh.End( );
Matrices
Matrices can be used to position, rotate and scale the whole mesh without having to calculate everything yourself.
local matrix = Matrix( );
matrix:Translate( self:GetPos( ) ); -- set the position
matrix:Rotate( self:GetAngles( ) ); -- angles
matrix:Scale( Vector( ) ); -- and scale

cam.PushModelMatrix( matrix );

	mesh.Begin( MATERIAL_QUADS, 1 );

	mesh.QuadEasy( vector_origin, vector_up, 50, 50 );

	mesh.End( );

cam.PopModelMatrix( );
The above example will draw the same quad, but relative to the entity. The quad will move and rotate together with it.
Normals, lighting
You may have notices that, in the previous examples, meshes were acting weird. They were either black or flickering (this may depend on the material you used). The engine didn't have enough information to properly light the meshes.
Before we go any further, lets write a helper function for defining vertices:
local function EasyVert( position, normal )

	mesh.Position( position );
	mesh.Normal( normal );

	mesh.AdvanceVertex( );

end
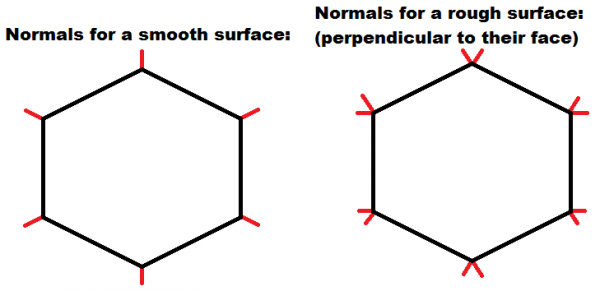
In order to light the mesh properly, each vertex requires a normal. Normals are unit vectors. The normal describes the surface curvature of the mesh. If normals are distributed over the mesh evenly, the surface will be smooth. If the vertices that make up a single polygon have their normals perpendicular to the polygon, the surface will not be smooth. Whether the surface needs to be smooth depends on what you want to make. Spheres and such need to be smooth in order to imitate detail, whereas cubes do not. You can find more information about lighting here.
Lets draw the same quad, but this time with lighting:
self:DrawModel( );

local matrix = Matrix( );
matrix:Translate( self:GetPos( ) );
matrix:Rotate( self:GetAngles( ) );
matrix:Scale( Vector( ) );

cam.PushModelMatrix( matrix );

	mesh.Begin( MATERIAL_QUADS, 1 );

	EasyVert( Vector( -25, -25, 0 ), vector_up );
	EasyVert( Vector( -25, 25, 0 ), vector_up );
	EasyVert( Vector( 25, 25, 0 ), vector_up );
	EasyVert( Vector( 25, -25, 0 ), vector_up );

	mesh.End( );

cam.PopModelMatrix( );
Whenever facing a light, the surface will be bright. It will get darker as either the distance increases or the surface no longer faces the light.
Note that, for lighting to work properly, you need to draw the entity's model before drawing the mesh. This is a bug, as lit meshes can only be drawn from an entity.
Textures, UV coordinates
Vertices are not described only by position and normal. There are multiple other values such as colors and tangents. For a mesh to properly use textures, each vertex requires UV coordinates. UV coordinates define which part of a texture is applied to that vertex. U is horizontal, V is vertical. 0, 0 represent the top left corner of a texture and 1, 1 represent the bottom right corner.
First, lets modify our EasyVert function:
local function EasyVert( position, normal, u, v )

	mesh.Position( position );
	mesh.Normal( normal );
	mesh.TexCoord( 0, u, v );

	mesh.AdvanceVertex( );

end
Since now we've been using a plain white texture. Lets use an actual colored texture, such as "models/props_c17/paper01".
The following will draw a textured quad:
mesh.Begin( MATERIAL_QUADS, 1 );

-- top left
EasyVert( Vector( -25, -25, 0 ), vector_up, 0, 0 );
-- top right
EasyVert( Vector( -25, 25, 0 ), vector_up, 0, 1 );
-- bottom right
EasyVert( Vector( 25, 25, 0 ), vector_up, 1, 1 );
-- bottom left
EasyVert( Vector( 25, -25, 0 ), vector_up, 1, 0 );

mesh.End( );
The function mesh.QuadEasy sets up the UV coordinates for you together with proper normals.
The following will draw a textured cube:
function ENT:Draw( )

	self:DrawModel( );

	render.SetMaterial( MeshMaterial );

	local matrix = Matrix( );
	matrix:Translate( self:GetPos( ) );
	matrix:Rotate( self:GetAngles( ) );
	matrix:Scale( Vector( 50, 50, 50 ) );

	local up = Vector( 0, 0, 1 );
	local right = Vector( 1, 0, 0 );
	local forward = Vector( 0, 1, 0 );

	local down = up * -1;
	local left = right * -1;
	local backward = forward * -1;

	cam.PushModelMatrix( matrix );

		mesh.Begin( MATERIAL_QUADS, 6 );

		mesh.QuadEasy( up / 2, up, 1, 1 );
		mesh.QuadEasy( down / 2, down, 1, 1 );

		mesh.QuadEasy( left / 2, left, 1, 1 );
		mesh.QuadEasy( right / 2, right, 1, 1 );

		mesh.QuadEasy( forward / 2, forward, 1, 1 );
		mesh.QuadEasy( backward / 2, backward, 1, 1 );

		mesh.End( );

	cam.PopModelMatrix( );

end
