GLuaModule
From GMod Wiki
| | Go to: Development Tools |
| This article has been tagged to be merged with content from GModInterface. If you wish for the page to be handled differently, this can be disputed on the linked talk page. See more articles tagged to be merged here. Comments: If these overlap, please edit/delete GModInterface |
Page Details
| Lua: Development of GLua modules |
| An article explaining the making of GLua modules using C++. | |
| Overv | |
| | 7th June 2010 |
Introduction
I'm tired of the fact developing GMod Lua modules in C++ is something reserved for people who can make sense out of the cryptic descriptions on the wiki. That's the primary reason I decided to write this article. In contrary to the current "documentation", this article will describe every single step, from getting the required files to compiling your module. Unfortunately I haven't tried developing GLua modules for Linux yet, so it would be great if someone added the information regarding that. If you've been doing C++ for a while, you should be able to get a simple module up and running in about 20 minutes, otherwise stay with me and you'll be using a simple module in about 40 minutes.
Prerequisites
- Microsoft Visual C++ Express (2005 or 2008 preferred.)
- Source SDK
- Basic C++ knowledge (Headers, pointers, classes)
Acquiring Lua interface headers
The first thing you need to install are the Lua interface headers. Create a new directory in a location on your PC which you can easily find. Then there's two ways to acquire the headers.
- Extract them using Subversion from this repository.
- Use Save Link As... or a similar feature in your browser to manually save the files from the repository above in the folder you just created.
After that, your directory should look like this:

Acquiring Source development files
Start the Source SDK and select the Source Engine 2007 Engine(Game: Half-life 2: Episode 2). After that, double click the "Create a mod" menu item.
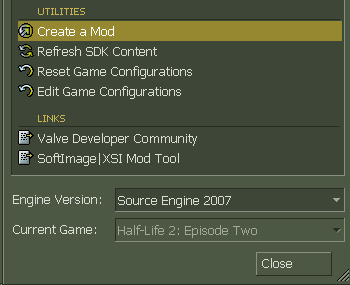
In the wizard which appears select Source code only (advanced users only). Then fill in a path you can easily find (e.g. C:/SourceSDK/) and for mod name just fill in something like "SourceSDK".
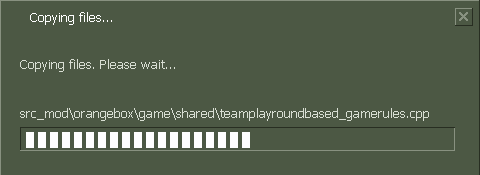
Shortly after it has copied all the files, it should come up with "Mod wizard complete" after you've clicked Next.
Setting up a module project file in Visual C++
Start by creating a new Win32 project. I think it's useful to use the module name as project name, so I named mine gm_tutorial.

Press OK and a wizard will start. Press Next once and in the following screen select the following project options.
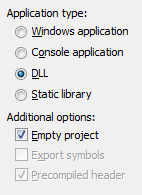
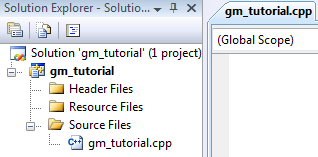
After that, press Finish and you've got yourself an empty DLL project. Start by adding a new code file to your project by right clicking the bold project name and pressing Add -> New Item. Select "C++ file (.cpp)" and give it a name you like. Most coders use either the module name again (gm_tutorial.cpp) or call the main file main.cpp. You should now be facing an empty code file in the editor.
Now, first change the project configuration from Debug to Release. It's in the dropdown menu next to the green play button. After that, right click your project name again and click Properties. Select C/C++ and click on the ... button on the right side of the Additional Include Directories textbox. You may have to select it to make the button visible. After you've clicked it, an additional window will open. You have to add three directories here:
- The folder to which you extracted your GMod Lua headers.
- In the SourceSDK, you'll find the folders src/public and src/public/tier1. Add them both.
You should end up with something like this:

Now there's one more thing we need to change before your project is ready. Select General on the right and change the setting Character Set to Use Multi-Byte Character Set.
Your first module
I'll start by giving you code to mindlessly copy and paste into the code file you created above. Before I'm going to explain how to write a module, we're going to verify you configured your project correctly first. So, first paste the following code:
// Skip rarely used Windows API functions
#define WIN32_LEAN_AND_MEAN

// Headers
#include <GMLuaModule.h>

// Module definition
GMOD_MODULE( Init, Shutdown );

// Globals
ILuaInterface* g_Lua;

// Initialization
int Init( lua_State *L )
{
	g_Lua = Lua();

	return 0;
}


// Shutdown
int Shutdown( lua_State *L )
{
	return 0;
}
If you set up your project correctly, pressing F7 (or Build -> Build Solution in the menu at the top) should return something like this:
1>gm_tutorial - 0 error(s), 0 warning(s)
========== Rebuild All: 1 succeeded, 0 failed, 0 skipped ==========
If it returns 1 failed and displays errors, see Troubleshooting before continuing. If it compiled correctly, then congratulations! You've just compiled your first module! Unfortunately, it doesn't do anything at all and what are all these weird functions? I will now tell you what the code you just pasted does.
#define WIN32_LEAN_AND_MEAN
This is just something you need to remember. It speeds up compiling on Windows, because it skips certain Win32 functions that are rarely used.
#include <GMLuaModule.h>
This is the header you need to include to tell Visual Studio about the Lua module interface.
GMOD_MODULE( Init, Shutdown );
This is a macro with which you define the functions that are called when your module is loaded and unloaded, respectively the initialize and shutdown functions. You can see that the functions Init and Shutdown are defined a bit lower. We'll get to those in a minute.
ILuaInterface* g_Lua;
This defines a global pointer to the Lua interface given to you by Garry's Mod. It's a class you will use to communicate with Lua from your module. We'll get to that in the next chapter.
int Init( lua_State *L )
{
	g_Lua = Lua();

	return 0;
}
We just defined that Init is the initialization function, so this will be the first function that's called when your module is loaded. Lua() is a function defined in one of the Lua module headers and returns the pointer to the Lua interface described above. You return 0 to let Garry's Mod know your module loaded successfully, just like with regular programs.
int Shutdown( lua_State *L )
{
	return 0;
}
We defined that this function will be called as soon as the module is unloaded. This will happen when the map changes or when the server shuts down. In the next chapter we'll add our very first function.
Making a C++ function callable by Lua
To keep things simple, we're just going to print a message. First we'll write a function without arguments or return values to get familiar with Lua/C++ functions themselves. Add the following code above your initialization function:
LUA_FUNCTION( PrintSomething )
{
	g_Lua->Msg( "Hello, there!\n" );
	return 0;
}
There's lots of stuff happening here, so I'll describe it line by line again.
LUA_FUNCTION( PrintSomething )
LUA_FUNCTION is another macro which simplifies defining a function callable from Lua. We called our function PrintSomething, because it... prints something. Makes sense.
g_Lua->Msg( "Hello, there!\n" );
This shouldn't be hard to figure out. Now that we have access to a Lua interface, we can use its Msg function to display a message in the console. Like the Msg function in Lua, we have to manually add a newline character.
return 0;
This line does more than you think. In a function callable by Lua you need to return the amount of values you return. As you know, Lua supports multiple return values, so we need to tell Lua how many there are. Because we just print something here and we're not giving any feedback, we'll just return 0.
Defining a function does not mean it's immediately callable from Lua. We need to assign it to a variable in Lua first. Because our Init function is called as soon as the module is loaded, it's a good place to assign our function. We do this by using the SetGlobal function in the Lua interface:
g_Lua->SetGlobal( "PrintSomething", PrintSomething );
SetGlobal requires two parameters: A string with the variable name in Lua and a value to assign to it. It can also be used to assign strings, doubles, floats and arbitrary Lua objects (We'll get to those later). Your initialization function should now look like this:
int Init( lua_State *L )
{
	g_Lua = Lua();

	g_Lua->SetGlobal( "PrintSomething", PrintSomething );

	return 0;
}
If the empty example compiled fine, this should too. Now that our module actually does something, let's try using it. Browse to your project directory, which is usually something along the lines of Documents/Visual Studio 2008/Projects/gm_tutorial. In that directory you should see a folder Release with the compiled .dll file. Make sure you've compiled your project after adding the PrintSOmething function, or you'll be wasting time getting an empty module to do stuff. Copy the .dll file to your garrysmod/lua/includes/modules/ folder. You can do this on both your client or a dedicated server. I personally prefer testing modules on a dedicated server, because they're much faster to restart after editing your module. After you have copied the module, start your client or server and when in-game, test your module by doing something along the lines of this:

If all went well, you should be able to do the above. Tap yourself on the shoulder, you've just created your first functional module! If it didn't work, see Troubleshooting below.
Functions with arguments and return values
In this chapter we're going to write a function that takes two numbers and returns both the sum and the product. As usual, I'll first post the code and then describe it line by line.
LUA_FUNCTION( SumProduct )
{
	g_Lua->CheckType( 1, GLua::TYPE_NUMBER );
	g_Lua->CheckType( 2, GLua::TYPE_NUMBER );

	float a = g_Lua->GetNumber( 1 );
	float b = g_Lua->GetNumber( 2 );

	g_Lua->Push( a + b );
	g_Lua->Push( a * b );

	return 2;
}
By the way, if you forgot how to make this function callable by Lua, scroll up.
g_Lua->CheckType( 1, GLua::TYPE_NUMBER );
g_Lua->CheckType( 2, GLua::TYPE_NUMBER );
CheckType checks if a value on the Lua stack can be converted to the given type. In this case we check if the first two arguments are both numeric. More about the Lua stack later.
float a = g_Lua->GetNumber( 1 );
float b = g_Lua->GetNumber( 2 );
Now that we know both arguments are numeric, we can retrieve them using GetNumber. For other types, there's GetString, GetBool and others.
g_Lua->Push( a + b );
g_Lua->Push( a * b )
Push 'pushes' a value onto the Lua stack. The Lua stack can be seen as a pile of plates. With Push we add a new plate on top of the pile and with Pop, we remove the dish from the top of the pile.
return 2;
Remember the last chapter? We have to return the amount of arguments this function returns, so that Lua knows how many values it has to pop off the stack. After you've assigned this function to a global in Init, we can start using it in Lua. Here's some example output:

You should understand now that the Lua stack is Lua's way of passing variables around. It's what makes it possible to conveniently handle arguments, return values and a lot more!
ILuaObject
So far we've only been setting values in Lua using SetGlobal:
g_Lua->SetGlobal( "pi", 3.1415926 );
g_Lua->SetGlobal( "LuaIsAwesome", true );
g_Lua->SetGlobal( "CoolCFunction", SomeFunctionInTheModule );
What about getting values? For that, Garry has provided a useful class, called ILuaObject. It can hold any variable Lua code can use. Let's try getting the global print function:
ILuaObject* printFunc = g_Lua->GetGlobal( "print" );
GetGlobal requires just a string with the identifier and returns a pointer to an ILuaObject* referencing the global. This may sound a bit complicated, so let's see a usage example:
ILuaObject* printFunc = g_Lua->GetGlobal( "print" );
g_Lua->SetGlobal( "include", printFunc );
Now that probably makes a lot more sense! As you've probably guessed we overrided include with print. It's the C++ equivalent of doing this in Lua:
include = print
However, we've forgotten something! After having used an ILuaObject*, you have to UnReference it:
printFunc->UnReference()
If you forget to do this, you'll leak memory!
Calling a function in Lua from C++
Now that we know how to acquire an ILuaObject, we're going to use it to call a function in Lua. Let's try to print a message using print:
ILuaObject* print = g_Lua->GetGlobal( "print" );
	g_Lua->Push( print );
	g_Lua->Push( "Hello, there!" );
	g_Lua->Call( 1, 0 );
print->UnReference();
As you can see the Lua stack is required again! When calling a Lua function, we first have to push it onto the stack. Then we push the arguments, in this case only one. And we finish the calling procedure with Call. Call takes two arguments, the amount of arguments pushed onto the stack and the amount of values we expect print to return. Of course the latter is 0, because print just prints something and doesn't return anything.
Table manipulation and more advanced function calling
ILuaObjects are also really useful if we want to manipulate a table in Lua from C++. Remember that an ILuaObject can hold any value Lua can use? Well, it can also reference a table! Let's try returning the sine of 1 radian:
ILuaObject* math = g_Lua->GetGlobal( "math" );
	ILuaObject* sin = math->GetMember( "sin" );
		g_Lua->Push( sin );
		g_Lua->Push( 1.0f );
		g_Lua->Call( 1, 1 );
		float result = g_Lua->GetReturn( 0 )->GetFloat();
	sin->UnReference();
math->UnReference();
Most of this should be familiar already or at least easy to understand. You should first notice that we don't have to push both math and sin onto the stack, just the function sin we retrieved. GetMember returns a field in a table with the specified key, so we're pretty much doing the equivalent of this in Lua:
local mathtbl = _G[ "math" ]
local sinfunc = mathtbl[ "sin" ]
local result = sinfunc( 1.0 )
Garry's Lua interface tends to be inconsistent, so instead of just retrieving the return values from the stack, we have to use the function GetReturn, which returns the familiar ILuaObject. We use its member function GetFloat to convert it to a float we can use in C++. Finally we unreference the two ILuaObjects to prevent memory leaks.
Iterating a table
Here is an example of how to iterate over a lua table in C++.
ILuaObject* tbl = g_Lua->GetGlobal("debug");

if (!tbl->isTable()) // make sure the lua global "debug" is a table before trying to iterate it
	// stop, if this is a function you probably would want to just return 0, and perhaps print an error message.

CUtlLuaVector* pairs = tbl->GetMembers();

for (int i = 0; i < pairs->Count(); i++) {
	LuaKeyValue& entry = pairs->Element(i);

	g_Lua->Push(g_Lua->GetGlobal("print"));
	g_Lua->Push(entry.pKey);
	g_Lua->Push(entry.pValue);
	g_Lua->Call(2, 0);
}
The second line of the for loop also shows that you can get a global and push it at the same time, without having to store the result of a call to GetGlobal in an intermediate ILuaObject*.
User data
When you've played around with your own module for a while, you'll probably want Lua to not just access C++ functions, but also objects defined by C++. We can accomplish this using user data. Let's say, we want an object called Counter which initializes a number to 0 and contains three functions: Increase, Decrease and GetNumber.
// Counter class
class Counter
{
public:
	Counter() { number = 0; }

	void Increase() { number++; }
	void Decrease() { number--; }

	int GetNumber() { return number; }

private:
	int number;
};

// Function to get a new counter
LUA_FUNCTION( NewCounter )
{
	Counter* count = new Counter();
	g_Lua->PushLightUserData( count );
	return 1;
}

// Function to increase a counter
LUA_FUNCTION( IncreaseCounter )
{
	g_Lua->CheckType( 1, GLua::TYPE_LIGHTUSERDATA );

	Counter* count = (Counter*)g_Lua->GetLightUserData( 1 );
	count->Increase();

	return 0;
}

// Function to decrease a counter
LUA_FUNCTION( DecreaseCounter )
{
	g_Lua->CheckType( 1, GLua::TYPE_LIGHTUSERDATA );

	Counter* count = (Counter*)g_Lua->GetLightUserData( 1 );
	count->Decrease();

	return 0;
}

// Function to return the number of a counter
LUA_FUNCTION( GetNumberCounter )
{
	g_Lua->CheckType( 1, GLua::TYPE_LIGHTUSERDATA );

	Counter* count = (Counter*)g_Lua->GetLightUserData( 1 );
	g_Lua->Push( (float)count->GetNumber() );

	return 1;
}

// Function to return the number of a counter
LUA_FUNCTION( DestroyCounter )
{
	g_Lua->CheckType( 1, GLua::TYPE_LIGHTUSERDATA );

	Counter* count = (Counter*)g_Lua->GetLightUserData( 1 );
	delete count;

	return 0;
}

// Initialization
int Init( lua_State *L )
{
	g_Lua = Lua();

	g_Lua->NewGlobalTable( "counter" );
	ILuaObject* counter = g_Lua->GetGlobal( "counter" );
		counter->SetMember( "New", NewCounter );
		counter->SetMember( "Increase", IncreaseCounter );
		counter->SetMember( "Decrease", DecreaseCounter );
		counter->SetMember( "GetNumber", GetNumberCounter );
		counter->SetMember( "Destroy", DestroyCounter );
	counter->UnReference();

	return 0;
}
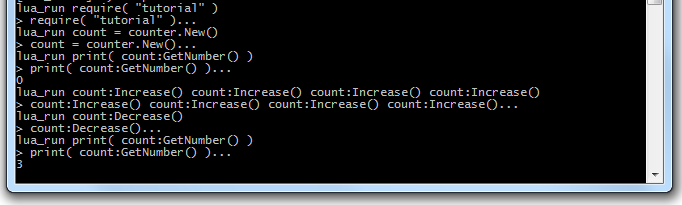
The only new thing we're doing here is using the UserData functions of the Lua interface. You should however be familiar with pointers to fully understand what's going on here. When counter.New is called, we allocate a new instance of the Counter class on the heap and return a pointer to it as an user data object. Lua will have no idea what the user data object means, unless we give a meaning to it. In this case we have four functions to manipulate Counter objects. All we need to do is converting the user data back to a pointer to the original Counter object and we can do everything we want with it! Here's some example usage:
Unfortunately that doesn't look very object oriented. We can make it object oriented by providing a meta table for the user data. We'll do this in the next chapter. The user data used in this chapter is called light, because it doesn't have a meta table.
Useful snippets
Creating a table for your module functions
g_Lua->NewGlobalTable( "mymodule" )
ILuaObject* mymodule = g_Lua->GetGlobal( "mymodule" )
	mymodule->SetMember( "AddNumber", AddNumber )
	mymodule->SetMember( "GetPI", GetPI )
mymodule->UnReference()
Troubleshooting
While developing, there's a few common errors that happen to come up. Here are a few common ones and their solutions.
error C2664: 'Msg' : cannot convert parameter 1 from 'const char [6]' to 'const tchar *'
You've forgotten to set Character Set to Use Multi-Byte Character Set in your project properties under General.
fatal error C1083: Cannot open include file: 'tier1/utlvector.h': No such file or directory
You haven't entered the correct path to the Source SDK headers or perhaps you accidentally switched to Debug configuration?
fatal error C1083: Cannot open include file: 'GMLuaModule.h': No such file or directory
Same as above, but for the GMod Lua headers.
ERROR! Module 'gm_mymodule' not found!
You don't include the 'gm_', 'gmsv_' or 'gmcl_' prefix when you require your module.
Compiling on Linux (Riddler)
There are a number of things you need to change before a module will successully compile on linux.
Headers
For Windows, Linux and MacOSX support use these headers http://gmod-haza.googlecode.com/svn/trunk/SafeHeaders/
Compiler flags
I just used command line to test all this, as there is so many IDE's out there i'm not going to explain how to set up your IDE. Goggle will tell you how to do that. I'm using "g++" from GCC so if your compiler tells you that these flags do not work, you need to find the equilivant for your compiler.
My finished command line is
"g++ -m32 -fPIC -shared -I ~/riddler/modules/headers/ ~/riddler/modules/testmodule/main.cpp -o ~/riddler/modules/testmodule/gm_testmodule_i486.dll"
I'll go through this bit by bit.
- "g++" Use the g++ compiler
- "-m32" The server I used is a 64bit OS with a 32bit srcds running, so the module needs to be 32bit to work with the GMod server. This tells it to compile a 32bit module dispite the fact the OS is 64 bit. If you're running a 32bit OS this shouldn't be needed
- "-fPIC" Sometimes shared libraries need compiled in a special way, like now. Without going into to much detail, because a shared library may be mapped into memory at different locations each time it is loaded we need to tell it to compile and account for that. This tells it to do so.
- "-shared" Tells it to make a shared library. This is important it MUST be a shared library NOT STATIC
- "-I" this is telling it to include the directory with the header files in it. In this case "~/riddler/modules/headers/"
- "~/riddler/modules/testmodule/main.cpp" This tells it where the cpp file is that we want to compile
- "-o" This is just where to put the finished file and what to call it. In this case it's in "testmodule" and called "gm_testmodule_i486.dll"
Some important things to know
- As i'm sure some people know Linux shared libraries are not called ".dll" it calls them ".so" however, we can name it .dll and we NEED to as whatever is being used to find the modules at the time of writing, only finds .dll files.
- The _i486 seems to also be needed, makes sense I guess sense that's what srcds is. Without this in the file name I could not get it to load the module.
- Suffix of _linux.dll also works (though it is REQUIRED if you do not use the _i486 suffix!)
Other notes
- The source SDK files produce alot of errors for me, but most of it seems to be compiler problems due to my compiler not doing stuff the same way valves does. Looking into this is on my todo list. If I get it working ill add how to do it for all you g++ users.
Test file
This is the file I used to test if everything was working
#define NO_SDK
#define NO_SOURCE_SDK

#include <GMLuaModule.h>

GMOD_MODULE(Init, Shutdown);

LUA_FUNCTION( PrintSomething )
{
	g_Lua->Msg("Hello!\n");
	return 0;
}

int Init(lua_State *L)
{
	g_Lua->SetGlobal("PrintSomething", PrintSomething);

	return 0;
}

int Shutdown(lua_State *L)
{
	return 0;
}
Tip: Although it looks like g_Lua is never set, it is defined in one of the headers.
#define g_Lua modulemanager->GetLuaInterface( L )
Errors
NOTE: Some errors show when doing "lua_run require("modulename")". Not all of the errors I put here will be compile errors.
- "wrong ELF class: ELFCLASS64" - You're using a 64 bit library on a 32 bit srcds - recompile as 32bit
- "error: gnu/stubs-32.h: No such file or directory" - You are trying to compile as 32 bit on a 64 bit system without the correct file to do so - install glibc-devel or similar (name varies slightly) it will add the missing file
Ubuntu 10.04 x86_64: `sudo apt-get install libc6-dev-i386`
